 Easy Pillow Covers
If you plan to purchase fabric for the living room windows, it's a good time to spruce up the old pillows on the couch with some new covers. I've never been fond of those small toss pillows. When I relax, I like something more substantial behind my back or under my head. I usually purchase standard sized bed pillows at the local discount store and cover them, but this pattern can be adapted to any shape pillow. These can be as simple or fancy as you like, but the basic cover is a simple "envelope" construction.
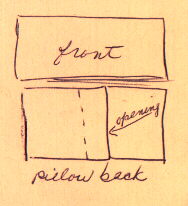
A cover for a standard pillow should measure 20"x26". You will need one yard of 45" wide fabric. From this you will cut one rectangle measuring 21" wide by 27" long for the front (allowing 1/2 all around for seams). And you will cut another two rectangles each measuring 21" wide by 18" long for the back (again allowing for 1/2" seams).
Make a narrow hem along one 21" width on each back section. Lay the front panel out with the right side facing you. Lay one back panel over the front panel placing the right sides
 of the fabric together matching the UNhemmed bottom and sides. The hemmed edge of the back panel will fall about 2/3rds of the way up the front panel. Take the 2nd back panel and match the unhemmed edges to the edges of the other end of the front panel. You will notice that the back panels overlap each other. Pin it all together and sew the 4 sides. Open it and you have created a simple sandwich pillow cover.
 Some nice ways of finishing this work are to use single fold bias tape around the outside edge (in this case you would have sewn it all together with the right sides of your fabric facing OUTward [wrong sides together] and then covered the seams with bias tape).
 Tip: You can even create your own tape from another piece of your same fabric (buy extra for this) or a contrasting color fabric by cutting strips on the bias. Cut 2" strips on the bias and join together using a bias seam. To create a bias seam, place the ends of two strips with right sides together at a 90 degree angle to each other and sew from corner to corner. Trim seam and open. You're done when the strip is long enough to cover the outside edge of your pillow cover. Use your iron to press down a 3/8" fold along each long side edge and then fold the strip in half and press that down. You now have a long strip of your own bias tape. It's a bit of knowledge that comes in handy for many sewing projects. Sewing the strips together on the bias to create a longer strip, reduces the bulk of any seams.
 Other ways to decorate are to add ruffles or lace along the seams. These would be basted to the front (facing inwards towards the center of the pillow) and then the 2 back panels would be pinned to the front in the usual manner. This sandwiches the lace between the layers in the proper position. When the cover is opened, the ruffle or lace edging would be in place and sewn into the seam.
These covers and inexpensive or old pillows you're willing to part with make great pet beds. We got tired of fighting the pets for our sofa pillows when all they really wanted was a soft place to lay their heads too. So using cheap polyester-filled, standard-sized pillows for the smaller ones and a larger pillow for the large dog, I created covers for them and they now all have their very own pillows/beds. The covers are tossed into the wash often, but the pillows themselves can be washed and dried regularly too, making these ideal pet beds. Make sure to buy polyester type filled pillows and not foam or feathers for this (feathers can be dried that way, but it's a pain to do and would trap too many "germs" and bugs with animals sleeping on them and, being a fire hazard, foam can't be placed in a dryer). You'll want to put them in the dryer with a couple of sneakers or tennis balls to keep them fluffed during the drying process.


